Big Toe Biomechanics: Beyond Dorsiflexion
The average adult takes between 5,000 – 8,000 steps a day. Often completely unaware of the complex motor programming that goes into each step we take, walking is one of most common movement patterns taken for granted.
In today’s blog we are going to focus on an aspect of gait (or rather a joint) that is often overlooked and where biomechanics are often over-simplified – meet the great toe joint aka the first metatarsophalangeal joint (MPJ).
Playing a critical role of how we push off with each step, the great toe joint can be linked to compensation patterns ranging from over-recruitment of the adductors (secondary to an early heel lift) to inhibition of the gluteus maximus (secondary to shortened stride length or apropulsive gait).
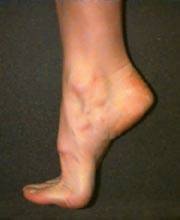
These faulty push-off mechanics are related to a limitation in great toe range of motion or dorsiflexion. Requiring at least 30 degrees of dorsiflexion for push-off, the optimal range of motion we want to see in our clients is actually closer to 65 – 75 degrees.
So what do we do if our client or patient presents with limited dorsiflexion?
We will explore below that due to the complexity of the foot (and human body in general) the goal of optimizing great toe dorsiflexion is not as simple as “stretch the joint”, “mobilize the joint” or “decompress the joint”.
Introducing the Roll, Slide and Compression
If we took a closer look at the biomechanical studies related to great toe dorsiflexion, we would find that shifting into propulsion or onto the great toe is a complex series of muscle activation patterns. Any delay in the timing of these muscle activation patterns, limitation in dorsiflexion will occur and compensation patterns soon follow.
Let’s take a closer look at how our great toe actually achieves the 30+ degrees of dorsiflexion necessary for push-off:
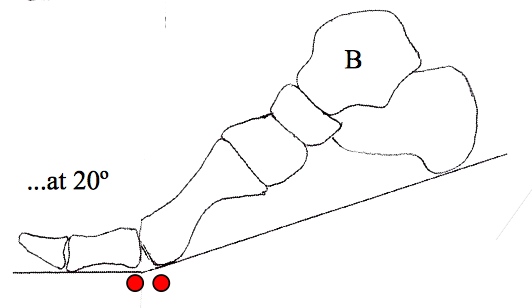
Step 1 – Roll (first 20 degrees of dorsiflexion)
First step of great toe dorsiflexion requires that the great toe be fixed to the ground while the 1st metatarsal head rolls over the base of the proximal phalynx. To adequately roll over the base of the proximal phalynx the great toe is stabilized by the following muscles:
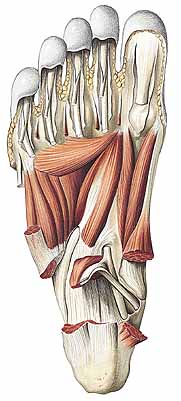
Flexor Hallucis Longus (FHL) – inserts on the plantar aspect of the distal phalynx and is responsible for keeping the great to fixed to the ground during propulsion.
Flexor Hallucis Brevis (FHB) – inserts on the plantar aspect of the proximal phalynx and is responsible for stabilizing 1st MPJ. Running through the tendons of the FHB are the sesamoids. These small bones act as a fulcrum for the 1st metatarsal head as it rolls over the base of the proximal phalynx.
Abductor Hallucis – inserts on the plantar aspect of the proximal phalynx and shares a tendon with the medial belly of the FHB. This muscle helps maintain 1st MPJ stability in the transverse plane.
Adductor Hallucis – inserts on the plantar aspect of the proximal phalynx and shares a tendon with the lateral belly of the FHB. Helps maintain 1st MPJ stability in the transverse plane (opposes the abductor hallucis)
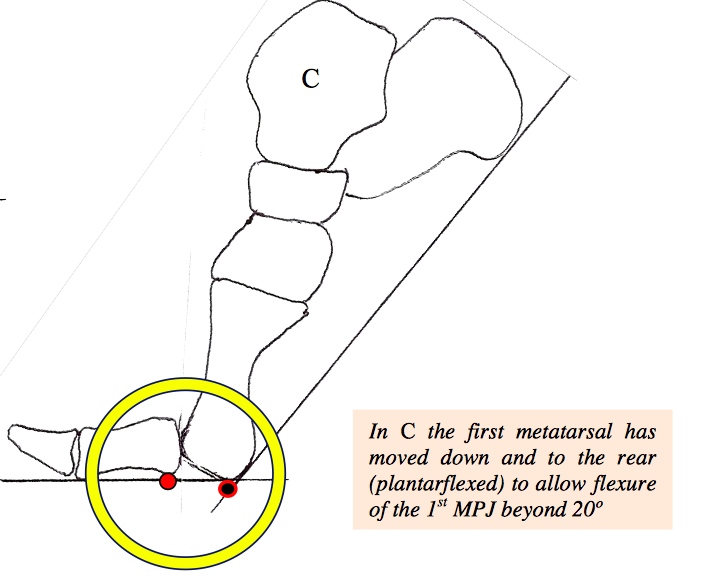
Step 2 – Slide (> 20 degrees dorsiflexion)
After the 1st metatarsal head rolls over the base of the proximal phalynx, now it is time to slide. This step requires the 1st metatarsal head to slide plantarly relative to the base of the proximal phalynx.
The muscle responsible for this step is the peroneus longus. Acting as an antagonist to the tibialis anterior (remember your spiral fascial line), the peroneus longus is a primary stabilizer of the first ray. When the peroneus longus engages it plantarflexes and laterally compresses the 1st metatarsal – creating the stability needed for push-off.
If a client cannot engage the peroneus longus fast enough what happens is we see them bypass Step 2 – Slide and head directly into Step 3 – Compression. Early compression of the 1s MPJ can lead to jamming, synovitis, capsulitis, pre-mature arthritis and an array of proximal compensation patterns.
This bypass of Step 2 into Step 3 is often referred to as Functional Hallux Limitus.
Step 3 – Compression
As our 1st MPJ moves into this final stage of dorsiflexion provides the stability requires for optimal transfer of forces and balance.
Optimizing 1st MPJ Dorsiflexion
So what is one of the best ways to optimize our clients or patients’ 1st MPJ dorsiflexion?
For the answer we need to go back to this bypassing of Step 2 – Slide. We must be asking ourselves, how can we assure proper peroneus longus function and activation?
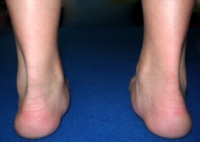
The answer? Look at the rearfoot. Is it everted?
Reason #1 – Peroneus Longus Function
In an everted subtalar joint the peroneus longus muscle is made lax or it loses it’s natural tension for proper force production. If the peroneus longus muscle is not able to properly oppose the tibialis anterior we begin to see what’s called metatarsal elevatus or dorsiflexion of the 1st ray. This leads to jamming of the 1st MPJ during dorsiflexion.
Reason #2 – Posterior Tibialis Function
In an everted subtalar joint the posterior tibialis is often underactive or weak. In previous blog articles we discussed how the posterior tibialis is part of the Deep Front Line and actually inserts into the peroneus longus tendon.
In a weak posterior tibialis there is no deep reflexive stabilization activation from the foot, and therefore no co-activation pattern between the Deep Front Line and the Spiral Line. This delay in activation leads to a bypass of Step 2 – Slide
So what can you do?
In patients with Functional Hallux Limitus or a delay in peroneus longus activation it is my goal to:
- Activate their intrinsics and Deep Front Line through short foot and barefoot training.
- Restore subtalar joint position through foot and glute strengthening
- Orthotic management if necessary (ideally temporary until they are out of pain)
If you are looking to learn more about foot function and the integration of this powerful complex into your client or patient programming please check out EBFA’s Programs including our
Barefoot Training Specialist® and BarefootRx® Rehab Specialist Certifications.
www.ebfafitness.com
Are you barefoot strong?

